


ARMO Now Supports GKE Autopilot Clusters 🎉
We’re excited to announce that ARMO now fully supports Google Kubernetes Engine (GKE) Autopilot clusters!...

Aug 25, 2024

Kubernetes stands at the forefront of the container orchestration revolution by becoming most people’s go-to container orchestration platform. While looking at all the features that Kubernetes brings into the picture, you may notice that the platform does not manage its own users. This stumps most first-time users, however, this is considered to be out of its primary responsibilities and by doing this, Kubernetes can focus on what it does best while offloading the authentication & authorization to more specialized providers.
Authentication and authorization take precedence when we look at how Kubernetes verifies and grants access to its clusters.
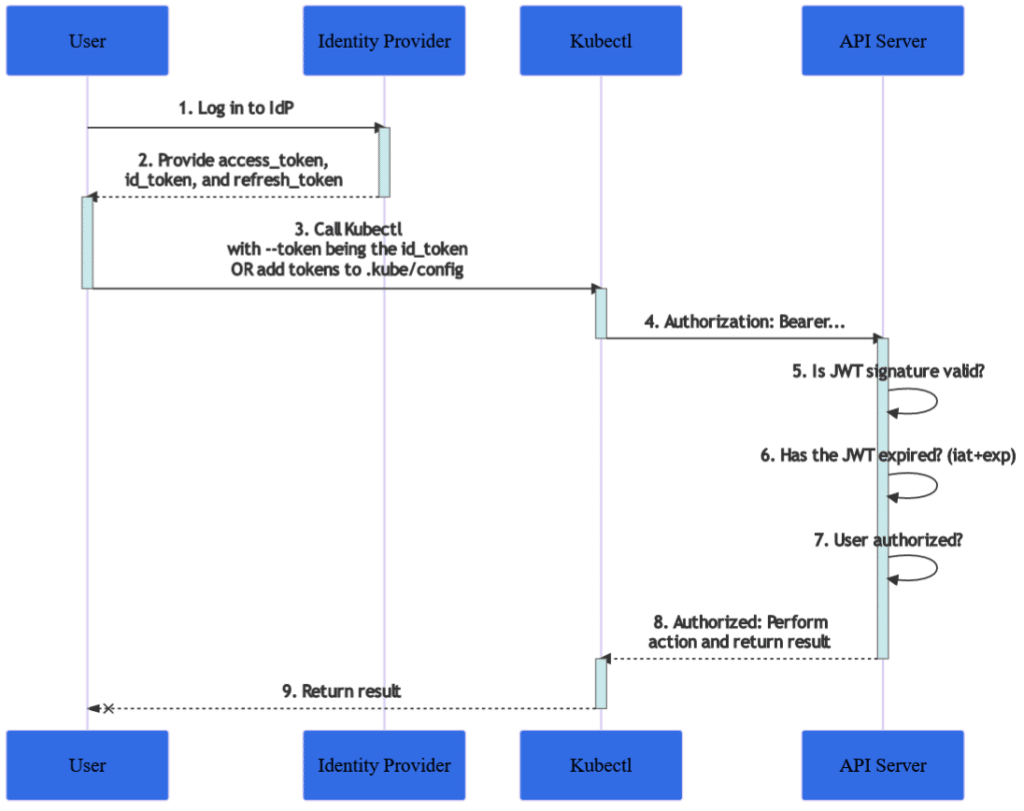
In standard deployments of Kubernetes, the user authentication takes place with the use of Transport Layer Security (TLS) certificates where any user with a valid TLS certificate that is signed by the certificate authority and accepted by the API server is authenticated. After authentication, Role-based access control (RBAC) takes over when deciding the level of authorization the authenticated user gets.
However, in large-scale environments, it is not always feasible to manage authentication via certificates, therefore Kubernetes allows organizations to integrate and offload the authentication and authorization to third-party services.
Some users may argue that it would be easier if Kubernetes managed its own set of users. This maybe true in small-scale deployments, however, when we look into large enterprises that operate with over 5000 employees, the story of managing each user in individual systems becomes a tedious task, therefore these large scale organizations often use a single source of truth, for all their authentications needs within the organization such as a centralized directory.
Kubernetes allows its users to integrate with various authentication mechanisms in order to allow for a far greater set of use cases. Some of the most common reasons as to why Kubernetes doesn’t manage its own users comes from this principle.
Let’s take a look at some of the most common reasons for this:
Now that we know Kubernetes supports various external connectors for authentication and authorization, we will look into how we can integrate these into our Kubernetes clusters.
Here are some popular options that most large scaled organizations use:
There are various OIDC providers such as Keycloak, Azure AD and Okta that you are able to integrate with. However in this example we will look into integrating Kubernetes with Azure AD.
In order to begin you would need to register and configure an application within Azure AD
1. Register an Application in Azure AD:
2. Configure Authentication in Azure AD:
3. Generate a Client Secret:
Generate a client secret for the registered application. Note down the secret, as it will be needed for Kubernetes configuration.
After the configuration on the Azure AD is complete, you can move on to configuring the Kubernetes cluster configuration.
4. Update Kubernetes API Server Configuration:
Edit the Kubernetes API server configuration to include the Azure AD OIDC parameters. This is often done in the kube-apiserver configuration file or via command-line flags. Replace the placeholders with your Azure AD information.
kube-apiserver \
  --oidc-issuer-url=https://login.microsoftonline.com/<your-tenant-id> \
  --oidc-client-id=<your-client-id> \
  --oidc-client-secret=<your-client-secret> \
  --oidc-username-claim=upn \
  --oidc-username-prefix=azuread:
Adjust the parameters based on your Azure AD configuration. The oidc-username-claim and oidc-username-prefix flags are optional and depend on how user information is provided by Azure AD.
5. Restart the Kubernetes API Server:
6. Test Azure AD Authentication:
kubectl version
The command should prompt you to authenticate via Azure AD. Follow the prompts and use your Azure AD credentials to log in.
7. Define RBAC Roles and Bindings:
apiVersion: rbac.authorization.k8s.io/v1
kind: ClusterRole
metadata:
  name: azuread-cluster-admin
rules:
- apiGroups: [""]
  resources: ["pods"]
  verbs: ["get", "list", "watch"]
##Add additional rules as needed

---

apiVersion: rbac.authorization.k8s.io/v1
kind: ClusterRoleBinding
metadata:
  name: azuread-cluster-admin-binding
subjects:
- kind: User
  name: "azuread:<username>"
  apiGroup: rbac.authorization.k8s.io
roleRef:
  kind: ClusterRole
  name: azuread-cluster-admin
  apiGroup: rbac.authorization.k8s.io
Replace <username> with the actual username obtained from Azure AD.
Integrating your Kubernetes cluster with OpenID Connect seems fairly straightforward with its native integration capabilities. However we cannot say the same about integrating your Kubernetes cluster with LDAP since there aren’t direct connectors to do this.
Instead, we rely on different approaches using third-party connectors to complete this integration.
In this example, we will look at how we can integrate Kubernetes with LDAP with the use of a Proxy; and we will be focusing on using Dex as our proxy.
We will be following the steps shown below in order to get this integration up and running.
Step 1: Install and Configure Dex
1. Install Dex:
2. Configure Dex:
3. Deploy Dex:
Step 2: Integrate Dex with Kubernetes API Server
1. Update Kubernetes API Server Configuration:
kube-apiserver \
  --oidc-issuer-url=https://dex.example.com \
  --oidc-client-id=k8s-client-id \
  --oidc-client-secret=k8s-client-secret
2. Restart the Kubernetes API Server:
Step 3: Test Authentication
1. Test Authentication:
kubectl version
Dex should prompt you for LDAP credentials, and upon successful authentication, you should be able to access the Kubernetes API.
We will now look into integrating your Kubernetes cluster with Webhooks and custom authentication plugins. However in order to proceed you need to be able to create and deploy your own Webhook, which is out of the scope of this blog post.
Step 1: Implement the Webhook Server
1. Develop the Webhook Server:
2. Expose the Webhook Server:
Step 2: Configure Kubernetes API Server
1. Edit kube-apiserver Configuration:
2. Add Webhook Configuration:
spec:
  containers:
  - command:
    - kube-apiserver
    - --authentication-token-webhook-config-file=/path/to/webhook-config.yaml
Step 3: Restart the Kubernetes API Server
1. Restart the Kubernetes API Server:
Step 4: Test Webhook Authentication
kubectl command-line tool to test authentication against the Kubernetes API server.kubectl version
Having to configure access for each entity within your Kubernetes cluster may seem like a daunting task, especially if you’re running a complex enterprise-scale cluster with 500+ users and accounts.
However, with the many connectors we looked at within this article, we don’t need to create individual mappings for each user. Instead, we can define roles for each of the access requirements and merge multiple entities into a single role.
Defining distinct roles and access permissions are crucial for many reasons such as:
Now that we’ve looked at integrating your Kubernetes clusters with these various authentication mechanisms, you must be wondering, What method should I use?
Let’s take a look at how you can use each of these connectors
Here are some use cases where using OIDC would be better:
Using LDAP for Kubernetes authentication has its own set of use cases where some organizations already have a centralized directory service that they use within the organization:
There are some use cases where webhooks are the way to go:
Kubernetes not managing its own users does not mean the end of world! Rather, it opens up numerous possibilities for flexible and extensible solutions. Looking back at the connectors that we looked at shows how versatile these connectors can be and where we can use each of them.
It is important to note that like any configuration, these external connectors are subject to drift and require monitoring. Regular audits and reviews are necessary to ensure that the user management systems remain aligned with the organization’s security requirements.
To help with this, ARMO Platform offers a powerful RBAC visualization tool that simplifies the auditing and control of RBAC configurations in Kubernetes. By leveraging ARMO Platform’s RBAC visualization capability, organizations can streamline their auditing processes, enhance their control over user management configurations, and ensure the ongoing security and compliance of their Kubernetes deployments.
We’re excited to announce that ARMO now fully supports Google Kubernetes Engine (GKE) Autopilot clusters!...
Software supply chain attacks cost businesses $45.8 billion globally in 2023 alone, and is projected...
Imagine this situation: you recently updated one of your infrastructure software components. A few weeks...

